Platform for creating and sharing projects Circuit Diagram An 8x8x8 LED cube is a visual treat with 3D effects and patterns. It works on the concept of Persistence of Vision, a feature of the human eye which tricks our brain in to thinking that an object is present permanently at a place if it appear about 60 times in a second. This video is to give some insights in creating a very large LED CUBE.I modeled this cube and construction jigs in fusion 360, led Driver PCB is made with Ki
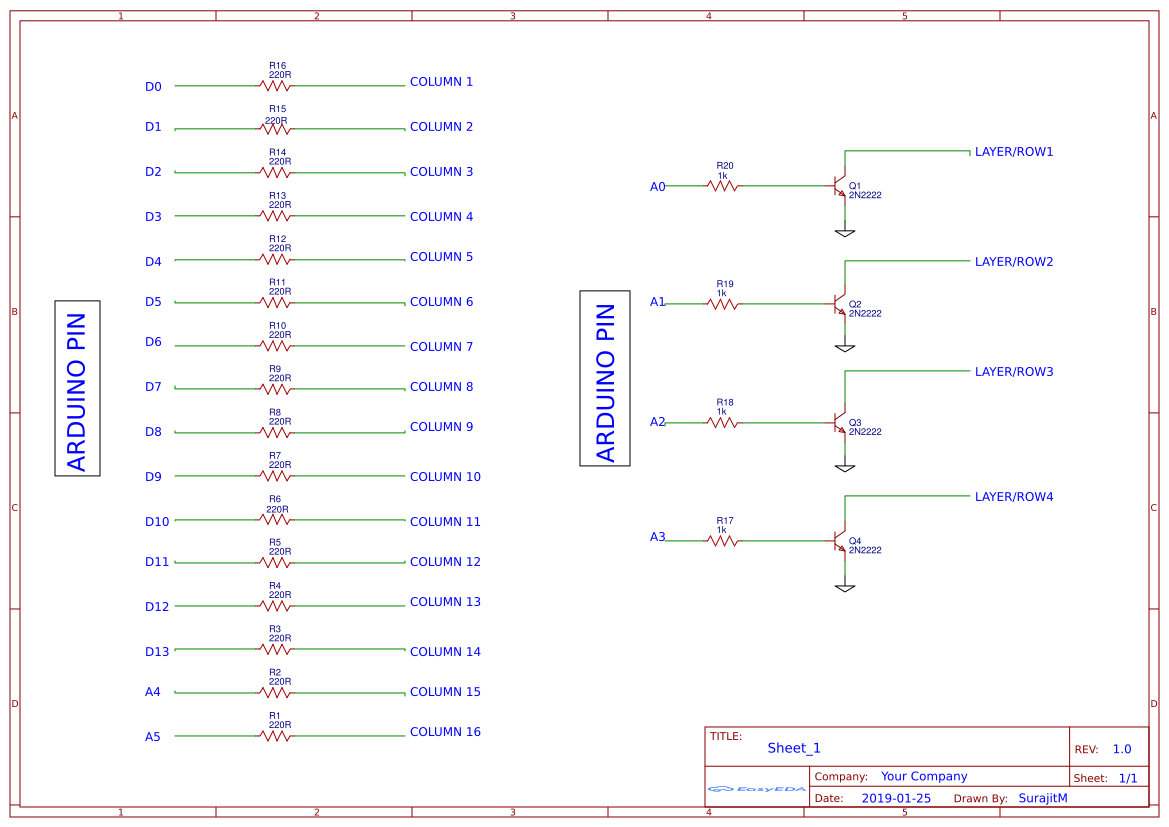
Pin Connection Diagram for LED Cube Step 8: Code and Programming You now have an LED cube. To make use of its coolness, it needs a program! I have attached a driver for rendering a 3D data space on the cube and functions to display some cool visual effects on the cube. You can use my code, write your own or build on the code to create endless A LED display of 8x8 pixels is only 64 LEDs, but a LED cube in 8x8x8 is 512 LEDs, an order of magnitude harder to make! This is the reason LED cubes are only made in low resolution. A LED cube does not have to be symetrical, it is possible to make a 7x8x9, or even oddly shaped ones.

How to Write Your Own 4x4x4 LED Cube Show for Arduino Circuit Diagram
It works nearly identical to the LED Video Wall in that the video decoder boards do all the hard work - All you need is a DVI/HDMI/Displayport output with the proper cable, a good 5V power supply and a little wiring time. The driver supports up to 1024x800 displays. Once programmed and configured you can use any video source! First off open open LED_1cube_4x4x4_Show_2 to make sure your cube is wired correctly. It should look like the video in the beginning. Once verifying that, take a look at the code and how it is put together. The only part that matters is the B0000 stuff. Everything else just don't touch.(with the exception of changing pin #) In this project, you will build an 8x8x8 LED cube as a display. After building the cube and learning the code basics, you will be able to write your own display animations. It is a great visual for scientific purposes and it will be a nice decorative addition to your room! During the process of the cube-building, you will acquire a whole slew
b. Download the LED Cube Arduino library or use a pre-written code available online. c. Open the code in the Arduino IDE, select the correct board (Arduino Uno), and upload the code to the board. Testing the LED Cube: a. Once the code is uploaded successfully, the LED Cube will start displaying various patterns and animations. b. soldering. Use one LED to punch an LED-sized hole through the foil for each hole. Cube template (the not as easy way): Find a piece of wood large enough to make a 1" 4x4 grid (leave a little extra room). Draw up a 4x4 grid of lines with a spacing of 1". Make dents at the intersect points with a center punch. Drill 16 holes small enough so that the

PDF Build a Programmable LED Cube Circuit Diagram
This is the full guide and demonstration for the making of an 8x8x8 LED cube.Follow the instructions on the video and upload the program to the cube created
![LED CUBE: Without Programming [How to Build] Circuit Diagram](https://i.pinimg.com/originals/94/d2/79/94d279433047965796caaa21ea5e17ec.jpg)